


Create Pomodoro Clock in JavaScript Tutorial | freeCodeCamp
September 09, 2019
12 min
Check out my Github for my free-to-read JavaScript Ebook that covers all the new features from ES6 to 2021. If you want find a great place for interactive tutorials, i recommend Educative where you can find my JavaScript course
This website contains affiliate links.
Having a navbar with links to different part of the page is a very common feature of many websites. Being able to smoothly scroll the page instead of jumping to the desired section can make the difference from a pleasant user experience to an annoying one. In this short tutorial we will look at how to implement a simple smooth scrolling navbar in your web page.
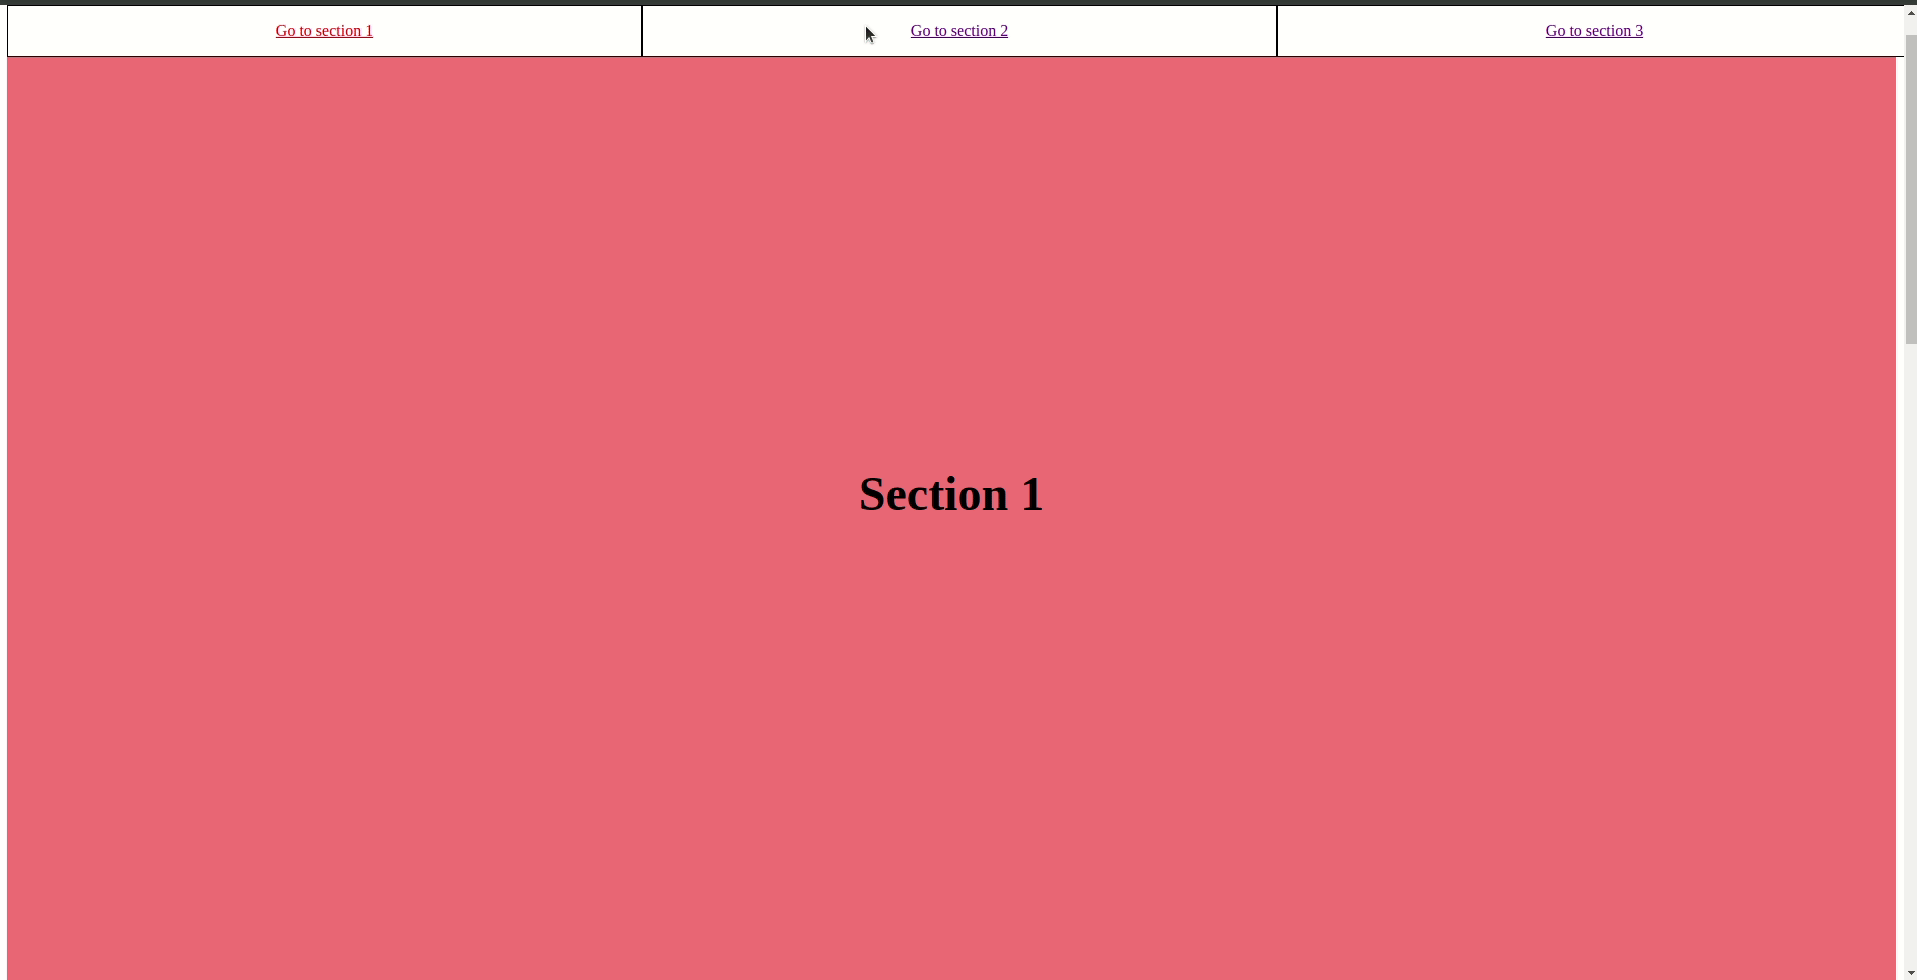
The structure of the page that we will create is very simple: - a navigation bar with three links - a content area with three sections Start by copying the code below inside the body tag of your html file.
<!-- navigation -->
<div id="navigation">
  <span><a href="#sectionLink1"> Go to section 1 </a></span>
  <span><a href="#sectionLink2"> Go to section 2 </a></span>
  <span><a href="#sectionLink3"> Go to section 3 </a></span>
</div>
<!-- content -->
<div id="content">
  <div id="section1">Section 1</div>
  <div id="section2">Section 2</div>
  <div id="section3">Section 3</div>
</div>
As you can see, our a tags have an href that is not exactly the same as the id of the target area. If we were to write href="section1" upon clicking the link, the page would jump straight to the content and we don’t want that, we want it to scroll smoothly therefore we use a similar, albeit different naming, to avoid this automatic behavior that we plan to override.
If you were to look at the page right now you would see that it looks nothing like the one in the result gif. Let’s open our style.css file and copy this code inside.
/* basic styling to make the links bigger */
#navigation {
  display: flex;
  /* make the navbar alway stay on top */
  position: fixed;
  top: 0;
  width: 100%;
  background-color: white;
}

#navigation span {
  flex-grow: 1;
  height: 50px;
  border: 1px solid black;
  display: flex;
  justify-content: center;
  align-items: center;
}

#navigation span a {
  display: inline-block;
}

/* when a link is clicked, it gets highlighted */
.highlighted {
  color: red;
}

/* make each section taller and give them different colors */
#content {
  margin-top: 50px;
}

#content div {
  height: 100vh;
  /* align the text in the middle */
  display: flex;
  justify-content: center;
  align-items: center;
  font-size: 3rem;
  font-weight: bold;
}

#section1 {
  background-color: lightcoral;
}

#section2 {
  background-color: lightblue;
}

#section3 {
  background-color: lightgreen;
}
The code itself is pretty self explanatory, you can look at the comments to clarify any doubt.
testNow, for the most important part of the tutorial, let’s stop for a second and think of how to achieve the result that we want. We need to add an event listener to each of our links and connect them to the target sections, adding a smooth scroll behavior.
document.addEventListener('DOMContentLoaded', () => {
  //  little hack to detect if the user is on ie 11
  const isIE11 = !!window.MSInputMethodContext && !!document.documentMode
  // get all the links with an ID that starts with 'sectionLink'
  const listOfLinks = document.querySelectorAll("a[href^='#sectionLink")
  // loop over all the links
  listOfLinks.forEach(function (link) {
    // listen for a click
    link.addEventListener('click', () => {
      // toggle highlight on and off when we click a link
      listOfLinks.forEach((link) => {
        if (link.classList.contains('highlighted')) {
          link.classList.remove('highlighted')
        }
      })
      link.classList.add('highlighted')
      // get the element where to scroll
      let ref = link.href.split('#sectionLink')
      ref = '#section' + ref[1]
      // ie 11 does not support smooth scroll, so we will simply scroll
      if (isIE11) {
        window.scrollTo(0, document.querySelector(ref).offsetTop)
      } else {
        window.scroll({
          behavior: 'smooth',
          left: 0,
          // top gets the distance from the top of the page of our target element
          top: document.querySelector(ref).offsetTop,
        })
      }
    })
  })
})
You can see that I have included a small trick to make our code work on Internet Explorer 11. Despite it being a very niche website, if you happen to be working on an enterprise software you will probably have to deal with it at one point so I figured it was worth giving you a hand on that. IE11 does not support smooth scrolling and if you remember, at the beginning of the tutorial I explained why we used different naming for the a tag and our div so, since we are ‘disabling’ the default click behavior, here we need to manually implement our own version of it to make the click of a button bring the user to the correct section. Enough of IE11, let’s look at the code from closer:
     listOfLinks.forEach(function (link) {
        // listen for a click
        link.addEventListener('click',  () => {
          // toggle highlight on and off when we click a link
          listOfLinks.forEach( (link) => {
            if (link.classList.contains('highlighted')) {
              link.classList.remove('highlighted');
            }
          });
          link.classList.add('highlighted');
First we take all of our a tag that we used in the navigation and we toggle a css class to style them differently upon click.
let ref = link.href.split('#sectionLink')
ref = '#section' + ref[1]
// ie 11 does not support smooth scroll, so we will simply scroll
if (isIE11) {
  window.scrollTo(0, document.querySelector(ref).offsetTop)
} else {
  window.scroll({
    behavior: 'smooth',
    left: 0,
    // top gets the distance from the top of the page of our target element
    top: document.querySelector(ref).offsetTop,
  })
}
Next, we store in the ref variable the number of the link that was clicked and we construct the target section with ref = "#section" + ref[1]; After that, it is simply a matter of creating the scroll action by adding a behavior and the coordinates of our section. Perfect ! You know now how to create a smooth scrolling navigation on your website.
Go ahead and implement it your way and feel free to share here a link to your attempt / project.