Changes made here will reflect at the start of the next work / break session
Your Sessions
- Nothing to see yet...
Check out my Github for my free-to-read JavaScript Ebook that covers all the new features from ES6 to 2021. If you want find a great place for interactive tutorials, i recommend Educative where you can find my JavaScript course
This website contains affiliate links.
In this tutorial, inspired by the freeCodeCamp curriculu, we are going to create a Pomodoro Clock to help you track the time you spend working on different tasks.
This is a live demo of the project:
These are the user stories for this Pomodoro Clock:
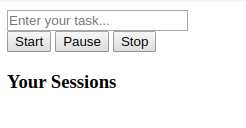
Now that we know what we want to achieve with this Pomodoro Clock, let’s start building a simple HTML structure.

We will start by creating a simple HTML structure to display a timer and add buttons to start, pause and stop it.
<div id="pomodoro-container">
  <div id="pomodoro-clock">
    <div id="pomodoro-timer"></div>
    <div id="pomodoro-clock-actions">
      <button id="pomodoro-start">Start</button>
      <button id="pomodoro-pause">Pause</button>
      <button id="pomodoro-stop">Stop</button>
    </div>
  </div>
</div>
Now that we have a basic structure let’s start working on our toggleClock function in the script.js file.
This function will be called by all three buttons and will either start, pause or stop the timer.
First, let’s attach an event listener to our buttons:
const pomodoroTimer = document.querySelector('#pomodoro-timer')

const startButton = document.querySelector('#pomodoro-start')
const pauseButton = document.querySelector('#pomodoro-pause')
const stopButton = document.querySelector('#pomodoro-stop')

// START
startButton.addEventListener('click', () => {
  toggleClock()
})

// PAUSE
pauseButton.addEventListener('click', () => {
  toggleClock()
})

// STOP
stopButton.addEventListener('click', () => {
  toggleClock(true)
})
We stored each of our buttons in a variable and attached event listeners to them.
As you can see, for the stopButton we are passing an argument in the toggleClock function. You will see why in a moment.
In order to know whether we need to play or pause the timer, we need an additional variable which we’ll call isClockRunning which by default will be bind to false.
let isClockRunning = false
We will need a few more variables to complete our initial set:
// in seconds = 25 mins
let workSessionDuration = 1500
let currentTimeLeftInSession = 1500

// in seconds = 5 mins;
let breakSessionDuration = 300
Now let’s start writing our toggleClock function.
const toggleClock = (reset) => {
  if (reset) {
    // STOP THE TIMER
  } else {
    if (isClockRunning === true) {
      // PAUSE THE TIMER
      isClockRunning = false
    } else {
      // START THE TIMER
      isClockRunning = true
    }
  }
}
toggleClock takes one argument, reset which gets passed only when we are stopping the timer, otherwise we will look at the value of the variable isClockRunning to see whether we need to play or pause the timer.
We will leverage the built-in method setInterval to track our timer.
Inside of the else statement, right below isClockRunning = true we can write:
clockTimer = setInterval(() => {
  // decrease time left / increase time spent
  currentTimeLeftInSession--
}, 1000)
What this does, is decrease our session time by 1 every second.
We want to be able to pause this timer when we click the pause button so go ahead and add this code to the toggleClock function right above isClockRunning = false :
clearInterval(clockTimer)
This will clear the timer that we set when we click the play button.
The last step for this initial milestone will be to display the timer in our page.
To do that we will create a function called displayCurrentTimeLeftInSession which will get called every second from our timer.
First, let’s add this line right under currentTimeLeftInSession--; so that our setInterval looks like this
clockTimer = setInterval(() => {
  currentTimeLeftInSession--
  displayCurrentTimeLeftInSession()
}, 1000)
Now, under our toggleClock function, let’s create a new one:
const displayCurrentTimeLeftInSession = () => {
  const secondsLeft = currentTimeLeftInSession
  let result = ''
  const seconds = secondsLeft % 60
  const minutes = parseInt(secondsLeft / 60) % 60
  let hours = parseInt(secondsLeft / 3600)
  // add leading zeroes if it's less than 10
  function addLeadingZeroes(time) {
    return time < 10 ? `0${time}` : time
  }
  if (hours > 0) result += `${hours}:`
  result += `${addLeadingZeroes(minutes)}:${addLeadingZeroes(seconds)}`
  pomodoroTimer.innerText = result.toString()
}
Wow, I bet you got caught off-guard by this function but don’t worry, it’s not as complicate as it seems.
Since we are storing our timer in seconds, we need a way to format it so that the user can see minutes and seconds and not just seconds.
The symbol % is called the remainder and you can read more about it here.
What it does is return the left over of the division of the first and second operand.
Example:
const x = 70
x % 60
// 10
Now image that x is our secondsLeft. 70 seconds essentially means 1 minute and 10 seconds.
As you can see, by using % 60 we get the seconds to display.
The next step is to get how many minutes are left in our timer and we do that like this:
const minutes = parseInt(secondsLeft / 60) % 60
This will return us 1.
The last step is to count the hours like so:
let hours = parseInt(secondsLeft / 3600)
3600 is the amount of seconds in one hour.
A proper clock should display time in this format: “07:08” so we need to have a way to add leading zeroes when the minutes or seconds are less than 10.
function addLeadingZeroes(time) {
  return time < 10 ? `0${time}` : time
}
This syntax may be confusing for a beginner but this is what is called a ternary operator and it is actually very simple and easy to use.
return time < 10 ? `0${time}` : time
Everytime before the ’?’ is what gets evaluated, in this case “is time less than 10?” and the first part in between the ’?’ and the ’:’ is what will return if the answer is YES whie the code after the ’:’ is what returns for a NO answer.
In plain text: “If time is less than 10, return time with a zero in front of it (eg: 09 instead of 9) and if time is more than 10, just return it”.
The last part of the code simply creates a string by interpolating hours (if any), minutes and seconds together.
if (hours > 0) result += `${hours}:`
result += `${addLeadingZeroes(minutes)}:${addLeadingZeroes(seconds)}`
If you don’t know what ${} means, you can read more about string interpolation here.
In short, it allows us to write both variables and plain text together without having to constantly add strings to each other with a plus sign.
Once we have our nicely formatted string representing the time left in our timer, it’s time to add it to our page with this simple line of code:
pomodoroTimer.innerText = result
Currently we can start and pause the timer but there is no way yet to stop it and reset it.
We already created a button for it and we also already hooked it up to an event listener so what is left now is to write the code for it.
Inside of our toggleClock function, right inside of the first if statement if (reset) { we write this:
stopClock()
We are calling a function that we haven’t created yet, so let’s do it now, outside of our toggleClock function.
When we stop the clock we want to do a couple of things:
const stopClock = () => {
  // 1) reset the timer we set
  clearInterval(clockTimer)
  // 2) update our variable to know that the timer is stopped
  isClockRunning = false
  // reset the time left in the session to its original state
  currentTimeLeftInSession = workSessionDuration
  // update the timer displayed
  displayCurrentTimeLeftInSession()
}
Ok, now we can reset the timer to its original state and if we press play again we can see it starts again from 25 minutes.
It’s time now to upgrade our pomodoro to do a bit more. In this section we will add a couple of features to it:
Go to the top of our code, where we declared all our variables and declare another one, called type which will hold a string of either ‘work’ or ‘break’:
let type = 'Work'
First let’s start with being able to toggle between ‘work’ and ‘break’ session.
Find this part of the code:
clockTimer = setInterval(() => {
  // decrease time left / increase time spent
  currentTimeLeftInSession--
  displayCurrentTimeLeftInSession()
}, 1000)
and substitute the line currentTimeLeftInSession--; with stepDown().
As we are going to make this part more complicate, it makes sense to take it out of this setInterval and make it its own function which I am going to call stepDown.
This function will be responsible of toggling between a ‘work’ and ‘break’ session when the timer runs out.
Outside of our toggleClock function we are going to create our stepDown function like so:
const stepDown = () => {
  if (currentTimeLeftInSession > 0) {
    // decrease time left / increase time spent
    currentTimeLeftInSession--
  } else if (currentTimeLeftInSession === 0) {
    // Timer is over -> if work switch to break, viceversa
    if (type === 'Work') {
      currentTimeLeftInSession = breakSessionDuration
      displaySessionLog('Work')
      type = 'Break'
    } else {
      currentTimeLeftInSession = workSessionDuration
      type = 'Work'
      displaySessionLog('Break')
    }
  }
  displayCurrentTimeLeftInSession()
}
This function is fairly simple, let’s break it down:
currentTimeLeftInSession > 0 it means that the timer is still running, therefore we simply want to decrease itcurrentTimeLeftInSession === 0 it means that the timer is over and we need toAs you can see, i’ve already added a call to displaySessionLog but I haven’t declared that function yet.
This function will take display a simple log of our completed sessions below our timer.
Firstly, let’s add some HTML to our page to make space for the logs that we are going to display.
Update your HTML so that it looks like this:
<div id="pomodoro-container">
  <div id="pomodoro-clock">
    <div id="pomodoro-timer"></div>
    <div id="pomodoro-clock-actions">
      <button id="pomodoro-start">Start</button>
      <button id="pomodoro-pause">Pause</button>
      <button id="pomodoro-stop">Stop</button>
    </div>
  </div>
  <!-- new -->
  <div id="pomodoro-info">
    <h3>Your Sessions</h3>
    <ul id="pomodoro-sessions"></ul>
  </div>
</div>
Let’s declare a new variable called timeSpentInCurrentSession that will increase every seconds that we spend in our session:
let timeSpentInCurrentSession = 0
Now, inside of the stepDown function, right under currentTimeLeftInSession-- let’s add this:
timeSpentInCurrentSession++
We will reset this counter every time a session finishes because the timer is over or because we stop it.
Still inside of stepDown we add a line right inside of the else if (currentTimeLeftInSession === 0) {:
timeSpentInCurrentSession = 0
And also in stopClock we add the same line.
This way, when the user stops a sessions, or when a session is over, we reset the counter.
Now we need to create a function to display the session log:
const displaySessionLog = (type) => {
  const sessionsList = document.querySelector('#pomodoro-sessions')
  // append li to it
  const li = document.createElement('li')
  let sessionLabel = type
  let elapsedTime = parseInt(timeSpentInCurrentSession / 60)
  elapsedTime = elapsedTime > 0 ? elapsedTime : '< 1'

  const text = document.createTextNode(`${sessionLabel} : ${elapsedTime} min`)
  li.appendChild(text)
  sessionsList.appendChild(li)
}
What we are doing here is getting our container div and appending a li with the content of a label and a duration in minutes.
Since we added a stop functionality, we need to also display a log when a user stops a timer.
Go inside of our stopClock function and edit it to look like this:
const stopClock = () => {
  // new
  displaySessionLog(type)
  clearInterval(clockTimer)
  isClockRunning = false
  currentTimeLeftInSession = workSessionDuration
  displayCurrentTimeLeftInSession()
  // new
  type = 'Work'
}
We only added two more lines:
displaySessionLog(type); to display the time spent so far in this sessiontype = 'Work'; to reset the session to workWe want to reset the session to work because it does not make sense for the user to reset a break session and start another break session so we want to always revert to a work session when the user stops.
If you think that it should be better to normally toggle the session type instead of always reverting to work you can try to implement it your way.
A starting point would be to substitute the line type = 'Work with
type = type === 'Work' ? 'Break' : 'Work'
This will toggle between work and break.
In this section we will continue upgradin the pomodoro to be able to customize the label of the work sessions and to be able to also customize the duration of both work and break session.
First, we will start with customizing the work label.
Inside our HTML code, right above our div of id pomodoro-clock-actions let’s put this code:
<div>
  <input
    type="text"
    id="pomodoro-clock-task"
    placeholder="Enter your task..."
  />
</div>
Now your Pomodoro should look like this:
 ;
;
It’s a simple input tag with a placeholder.
We want to display the label when the user stops or completes a sessions.
Also, we will make the label customizable only for work sessions, break sessions will always be displayed as break.
If you want the pomodoro to allow custom labels for break sessions you are free to try and implement it on your own, it’s very easy!
First, let’s create a new variable right below where we declared all the others:
let currentTaskLabel = document.querySelector('#pomodoro-clock-task')
Now, we will have to upgrade our displaySessionLog function and instead of let sessionLabel = type;, write this:
if (type === 'Work') {
  sessionLabel = currentTaskLabel.value ? currentTaskLabel.value : 'Work'
  workSessionLabel = sessionLabel
} else {
  sessionLabel = 'Break'
}
What this code does is first look at the type of session we are currently in, if it’s a ‘work’ session, it will look at the value of the input tag. In case we left it empty, ‘Work’ will be displayed, otherwise it will take our custom value.
If the session is of type ‘Break’ it will simply use the string ‘Break’ as the label for the log.
There is one more place where we have to edit the code and that is our stepDown function.
We need to update the function to take in account labels when finishing a session. When a ‘Break’ session finishes we want to display the proper ‘Work’ label and vice versa.
Update your stepDown function so that the else if (currentTimeLeftInSession === 0) looks like this:
else if (currentTimeLeftInSession === 0) {
  timeSpentInCurrentSession = 0;
  // Timer is over -> if work switch to break, viceversa
  if (type === 'Work') {
    currentTimeLeftInSession = breakSessionDuration;
    displaySessionLog('Work');
    type = 'Break';
    // new
    currentTaskLabel.value = 'Break';
    currentTaskLabel.disabled = true;
  } else {
    currentTimeLeftInSession = workSessionDuration;
    type = 'Work';
    // new
    if (currentTaskLabel.value === 'Break') {
      currentTaskLabel.value = workSessionLabel;
    }
    currentTaskLabel.disabled = false;
    displaySessionLog('Break');
  }
}
Since I said that I wanted only the ‘Work’ label to be customizable, I am disabling the input tag when we are in a ‘Break’ session by using currentTaskLabel.disabled = true;;
As I mentioned above, if you want you can customize this pomodoro to suit your needs. The thought behind this choice is that I don’t think there is a need for a user to customize a ‘Break’ label since that would make it more confusing but maybe you want to let your user edit it so they can differentiate a ‘toilet break’ from a ‘coffe break’.
Now, the next step is going to be the customization of the duration of both type of session.
First, let’s start adding two new input tags to our HTML. Update your code so that it looks like this:
<div id="pomodoro-container">
      <div id="pomodoro-clock">
        <div id="pomodoro-timer"></div>
        <div>
          <input type="text" id="pomodoro-clock-task" placeholder="Enter your task..." />
        </div>
        <div id="pomodoro-clock-actions">
          <button id="pomodoro-start">Start</button>
          <button id="pomodoro-pause">Pause</button>
          <button id="pomodoro-stop">Stop</button>
        </div>
        <!-- new -->
        <div id="pomodoro-clock-title">
          <span>
            Changes made here will reflect at the start of the next work /
            break session
          </span>
        </div>
        <div id="pomodoro-clock-actions">
          <div class="pomodoro-input">
            <label>Work Duration</label>
            <input name="input-work-duration" id="input-work-duration" type="number" />
          </div>
          <div class="pomodoro-input">
            <label>Break Duration</label>
            <input name="input-break-duration" id="input-break-duration" type="number" />
          </div>
        </div>
        <div id="pomodoro-info">
          <h3>Your Sessions </h3>
          <ul id="pomodoro-sessions">
          </ul>
        </div>
      </div>
    </div>
    </div>
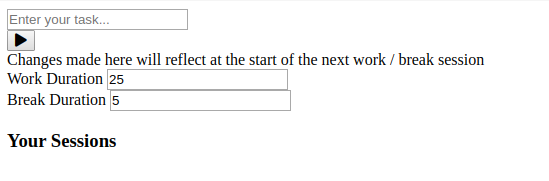
I have added a new title that says Changes made here will reflect at the start of the next work / break session, this is to let the user know that if they change the duration of a session, that will not affect the current one but only the next one onwards.
I have also added two new input tags, one for ‘Work’ sessions, one for ‘Break’ sessions.
Don’t worry too much about the classes and the overall styling of the pomodoro, we will style it at the end, now we are just focusing on the functionalities.
Since we said that the updated timers will be counted at the beginning of the next session, that means that when the user edits them they won’t affet our variable workSessionDuration and breakSessionDuration right away but they will be stored in two other variables and only when a session ends (because it runs out of time or because it gets stopped by the user) they will update the original timers.
Let’s start updating our code by first declaring four new variables at the top:
let updatedWorkSessionDuration
let updatedBreakSessionDuration

let workDurationInput = document.querySelector('#input-work-duration')
let breakDurationInput = document.querySelector('#input-break-duration')

workDurationInput.value = '25'
breakDurationInput.value = '5'
As you can see we are manually setting 25 and 5 as the values for our two input tags. To make life easier we are using a string representing the minutes in that timer. That means that the user will be allowed to edit the timer with a precision of 1 minute.
That also means that we will have to transform those values from minutes to seconds once we want to update the timer.
Now let’s add an event listener to each of our input tags right below our other event listeners.
// UPDATE WORK TIME
workDurationInput.addEventListener('input', () => {
  updatedWorkSessionDuration = minuteToSeconds(workDurationInput.value)
})

// UPDATE PAUSE TIME
breakDurationInput.addEventListener('input', () => {
  updatedBreakSessionDuration = minuteToSeconds(breakDurationInput.value)
})
Whenever a user inputs a new value in one of those input tags we are updating our temporary variable with a new value.
Here i am calling a function called minuteToSeconds that will help us convert the minute string from the input tag to seconds.
Right below the code we just wrote, add this:
const minuteToSeconds = (mins) => {
  return mins * 60
}
Very simply, to get a second we multiply the minutes by 60.
Now we will need to add a new function that will be called everytime we stop or we finish a session. This function will do two things:
updatedBreakSessionDuration to see if the user updated the session durationWe will call this function setUpdatedTimers.
const setUpdatedTimers = () => {
  if (type === 'Work') {
    currentTimeLeftInSession = updatedWorkSessionDuration
      ? updatedWorkSessionDuration
      : workSessionDuration
    workSessionDuration = currentTimeLeftInSession
  } else {
    currentTimeLeftInSession = updatedBreakSessionDuration
      ? updatedBreakSessionDuration
      : breakSessionDuration
    breakSessionDuration = currentTimeLeftInSession
  }
}
If type is ‘Work’ we check if the user updated the updatedWorkSessionDuration. If yes, we set that as the value for the next session, else we use the default value from workSessionDuration. Same goes for ‘Break’ session.
We don’t want to update the timer when the user pause and then starts a new session so we are going to have a new variable called isClockStopped that will help us know when we are starting the clock the first time and when we are starting it after a stop.
let isClockStopped = true
By default it’s true.
Let’s update our toggleClock function like this:
const toggleClock = (reset) => {
  if (reset) {
    stopClock()
  } else {
    // new
    if (isClockStopped) {
      setUpdatedTimers()
      isClockStopped = false
    }

    if (isClockRunning === true) {
      // pause
      clearInterval(clockTimer)
      // update icon to the play one
      // set the vale of the button to start or pause
      isClockRunning = false
    } else {
      // start
      clockTimer = setInterval(() => {
        stepDown()
        displayCurrentTimeLeftInSession()
      }, 1000)
      isClockRunning = true
    }
  }
}
I have added this code:
if (isClockStopped) {
  setUpdatedTimers()
  isClockStopped = false
}
Let’s also add a call inside of our stepDown function so that we will update the timers when a session finishes.
Add this function call: setUpdatedTimers(); under these two lines type = "Break"; and type = "Work";
When the clock is stopped it means we are starting the clock and not simply resuming after a pause. In that case we set our updated timers and toggle the variable to false.
The last part to update is our stopClock function which will look like this:
const stopClock = () => {
  setUpdatedTimers()
  displaySessionLog(type)
  clearInterval(clockTimer)
  isClockStopped = true
  isClockRunning = false
  currentTimeLeftInSession = workSessionDuration
  displayCurrentTimeLeftInSession()
  type = 'Work'
  timeSpentInCurrentSession = 0
}
When the user stops the clock, we set our variable isClockStopped to true and we call setUpdatedTimers.
Awesome, now we have a fully functional Pomodoro clock. There are a few things left to do before we can call it a day.
In this section we will finish our Pomodoro by adding some style to it and also implementing a circular progress bar which will show the user the progress they made so far in the current session.
Before we do that, I want to update our play, pause and stop buttons to use icons instead of text. I also want to only have the play icon show when the pomodoro is paused and the pause icon when the pomodoro is playing.
First, let’s add Font Awesome icons to our project.
Copy this code insid the head of our HTML:
<link
  href="https://cdnjs.cloudflare.com/ajax/libs/font-awesome/5.10.2/css/all.css"
  rel="stylesheet"
/>
Now update your buttons like this:
<button id="pomodoro-start">
  <i class="fas fa-play" id="play-icon"></i>
  <i class="fas fa-pause hidden" id="pause-icon"></i>
</button>
<button id="pomodoro-stop" class="hidden">
  <i class="fas fa-stop"></i>
</button>
I ditched one of the button tag because we won’t need it as we will simply be toggling the icon inside of the ‘Play’ button so go in your js code and remove these lines:
const pauseButton = document.querySelector('#pomodoro-pause')

// PAUSE
pauseButton.addEventListener('click', () => {
  toggleClock()
})
In your css file you can define the class hidden as such:
.hidden {
  display: none;
}
Done! It was very easy but the overall look of the Pomodoro is now much better.
 ;
;
Let’s go one step further and hide the pause icon when the clock is not working.
To do that, we will create a function called togglePlayPauseIcon
const togglePlayPauseIcon = (reset) => {
  const playIcon = document.querySelector('#play-icon')
  const pauseIcon = document.querySelector('#pause-icon')
  if (reset) {
    // when resetting -> always revert to play icon
    if (playIcon.classList.contains('hidden')) {
      playIcon.classList.remove('hidden')
    }
    if (!pauseIcon.classList.contains('hidden')) {
      pauseIcon.classList.add('hidden')
    }
  } else {
    playIcon.classList.toggle('hidden')
    pauseIcon.classList.toggle('hidden')
  }
}
It’s a simple function that I’m going to break down now:
reset is a boolean that will determine if we are resetting the clock. When resetting we always want to show the play icon, regardless if we reset when the clock was paused or not.classList of our elements and toggling a class of hiddenThis togglePlayPauseIcon function will be called inside of toggleClock so paste this code in the first line of that function:
 const toggleClock = reset => {
  togglePlayPauseIcon(reset);
  // ... the rest of the function
What is missing now is the stopIcon. If you look at our HTML above you can see that by default, the stop icon is hidden.
When the page first load and the clock is stopped, we have no reason to show the stop icon. It will show only when we start the clock the first time so let’s create a new function called showStopIcon that will look like this:
const showStopIcon = () => {
  const stopButton = document.querySelector('#pomodoro-stop')
  stopButton.classList.remove('hidden')
}
This function will also be called inside of our toggleClock function which now looks like this:
const toggleClock = (reset) => {
  togglePlayPauseIcon(reset)
  if (reset) {
    stopClock()
  } else {
    console.log(isClockStopped)
    if (isClockStopped) {
      setUpdatedTimers()
      isClockStopped = false
    }

    if (isClockRunning === true) {
      // pause
      clearInterval(clockTimer)
      // update icon to the play one
      // set the vale of the button to start or pause
      isClockRunning = false
    } else {
      // start
      clockTimer = setInterval(() => {
        stepDown()
        displayCurrentTimeLeftInSession()
      }, 1000)
      isClockRunning = true
    }
    // new
    showStopIcon()
  }
}
If you try now, you will see that when the page loads the stop icon won’t be there but as soon as you hit the play button, it will show alongside the stop icon.
Pasting here all the css code that i’ve used would only make this post longer than necessary and since the focus of the tutorial is on JavaScript, you can check out this link to get the necessary css code. [ TODO] ADD LINK TO THE TUTORIALS REPO.
Great, now it’s time to move on to the progress bar. For this task we won’t actually do the coding but we will leverage an existing library.
There are many out there to choose from but I’ve picked ProgressBar.js.
First, go to this link https://progressbarjs.readthedocs.io/en/latest/ and download the latest js file. Then, add it in your pomodoro folder and add this line in the head of your HMTL:
<!-- change progressBar.js to the actual name of your js file, if different -->
<script src="progressBar.js"></script>
Let’start by adding this code right after all our variable declarations in the JS file:
const progressBar = new ProgressBar.Circle('#pomodoro-timer', {
  strokeWidth: 2,
  text: {
    value: '25:00',
  },
  trailColor: '#f4f4f4',
})
Now you should see a circle with a label of “25:00” in the middle of it.
We can now get rid of the variable pomodoroTimer and also change this code:
pomodoroTimer.innerText = result.toString()
to:
progressBar.text.innerText = result.toString()
If you try to pay the pomodoro you will see that the label inside of the circle will update. We only need to animate the progress circle and we’ll be done.
The progress bar takes a value fro 0 to 1 so we need to calculate how much of the current session has been completed. For that, we’ll create a new function:
const calculateSessionProgress = () => {
  // calculate the completion rate of this session
  const sessionDuration =
    type === 'Work' ? workSessionDuration : breakSessionDuration
  return (timeSpentInCurrentSession / sessionDuration) * 10
}
We will need to call this function every second that the session plays so let’s add this line to the stepDown function so that clockTimer looks like this:
clockTimer = setInterval(() => {
  stepDown()
  displayCurrentTimeLeftInSession()
  progressBar.set(calculateSessionProgress())
}, 1000)
Now if we try to play the pomodoro we can see the progress bar moving every second.
Awesome, this marks the end of the tutorial, we have created a customizable timer to track our projects.
There are many ways that you can improve this project, one example would be to force a longer break after a certain set of work session have been completed.
If you liked this tutorial please share it with your friends and if you have something you would like to see for a future tutorial leave a comment.
Thank you for reading all the way here, the code for the project is available on github at this link.