


Find and Replace elements in Array with JavaScript
July 06, 2020
3 min
When reading a long article it’s easy to get lost, and that’s why the table of contents is very useful. In this short tutorial, I am going to show you how you can create a dynamically generated table of contents for your article with just a few lines of JavaScript.
What you are going to achieve by the end of this tutorial will be:
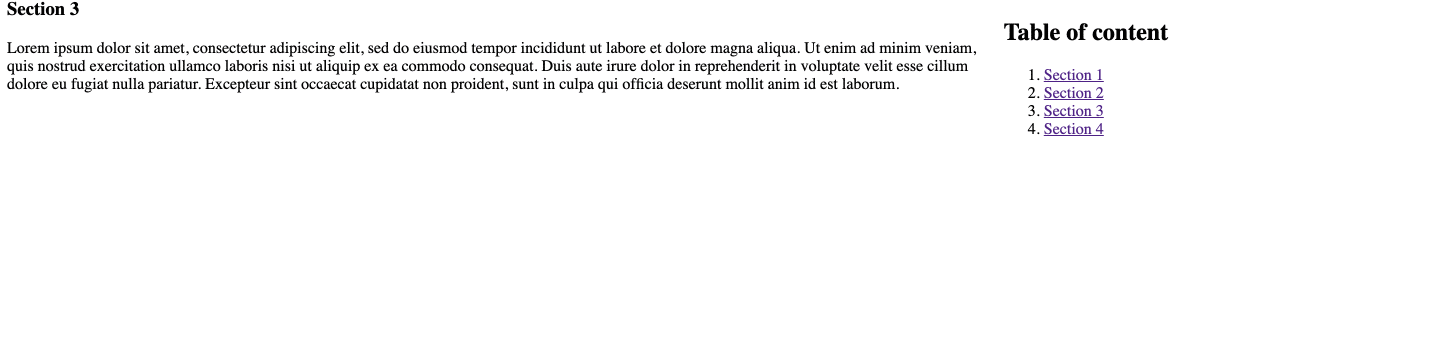
This is a demo of how the result will look like, if you want to see it in action, just look at the one on my blog [InspiredWebDev.com].
The HTML for this tutorial is very simple, we will simply create a dummy page with some lorem ipsum content.
Go ahead and copy this code:
<div id="container">
  <div id="content">
    <h3>Section 1</h3>
    <p>
      Lorem ipsum dolor sit amet, consectetur adipiscing elit, sed do eiusmod
      tempor incididunt ut labore et dolore magna aliqua. Ut enim ad minim
      veniam, quis nostrud exercitation ullamco laboris nisi ut aliquip ex ea
      commodo consequat. Duis aute irure dolor in reprehenderit in voluptate
      velit esse cillum dolore eu fugiat nulla pariatur. Excepteur sint occaecat
      cupidatat non proident, sunt in culpa qui officia deserunt mollit anim id
      est laborum.
    </p>
    <h3>Section 2</h3>
    <!-- go ahead and add as many section as you want -->
  </div>
  <div id="table-of-content">
    <h2>table of contents</h2>
  </div>
</div>
For the sake of keeping the code short, I’ve only added one section but feel free to add as many as you want, and also change the text to something more fun than a boring lorem ipsum.
Now that we have the skeleton that we’ll use for the tutorial, let’s go ahead and outline what we’ll need to do with JavaScript.
Let’s add some few lines of CSS to display both our two sections next to each other instead of one after the other. Open your CSS file and add:
#container {
  display: flex;
  justify-content: space-around;
  align-items: flex-start;
}

#content {
  width: 70vw;
}

#content div {
  height: 100vh;
}

#table-of-content {
  width: 30vw;
}
What we did here was just making the container flex and setting the width for our content and table of contents sections.
I also made each div in the content to be as tall as the viewport so that we can better see the scrolling in action.
These are the steps that we will follow to achieve the result that you saw in the demo above:
li that will be part of our table of contentsOk, now that we outlined our steps, let’s start our JavacScript page with a listener:
document.addEventListener('DOMContentLoaded', () => {
  // our code will go here
})
We want to wait until the page is loaded before we start interacting with the DOM.
The first step now is to take all the headings in our page and interate over them:
const headings = document.querySelectorAll('#content h3')
if (headings && headings.length) {
  // our code will continue inside here
}
We save all our headings in a variable and set a simple if statement to check if there are any before proceeding.
To create the table of the content we will need two elements:
Inside of the if statement, write this code:
let tableOfContentInner = ''
headings.forEach((heading, i) => {
  // generate an 'li' element that includes a link to the appropriate section
  tableOfContentInner += `<li><a href="#section_${i}">${heading.textContent}</a></li>`
  const originalHeadingContent = heading.innerHTML
  const anchor = `<a class="offset-anchor" id="section_${i}"></a>`
  // add the anchor to the <h3> tag
  heading.innerHTML = anchor + originalHeadingContent
})
What this code is doing is iterating over our list of headings and for each of them it’s first creating a li with an anchor tag inside and then it’s creating another anchor element and prepending it before our section headings.
As you can see, we set the href property of the first anchor to #section_${i} which will become ‘#section_1’, ‘#section_2’ and so on.
We use the # symbol to tell the hyperlink that this link is to an ‘id’ in the page and that is why the anchor that we prepended to the headings has an id="section_${i}".
Now that we have our variable tableOfContentInner that includes a list of li element, one for each section, what we need to do is to add it to the DOM and we can do that with two lines of code, outside of the forEach loop.
const tableOfContent = `<ol>${tableOfContentInner}</ol>`
// add the generated table of contents to the dive
document.querySelector('#table-of-content').innerHTML += tableOfContent
First, we added our list of li to an ol element and then pushed everything inside of our container in the DOM.
Awesome, go ahead and check it out in the browser, you will see that when you click an anchor tag it goes right at the point in the document that you need.
Our anchor currently sits right above the headings so when you click on a link the content will be right at the top of the page. In a real-life website, you probably have a navbar up there or you may just want to keep some breathing space on top of the title so you should add some CSS to the ‘offset-anchor’ class that I’ve given to the anchor.
.offset-anchor {
  display: block;
  position: relative;
  top: -150px;
  visibility: hidden;
}
Giving it a ‘top’ negative value will move it upwards, giving some breathing space to the content when you click on the relevant section.
Another problem that we have right now is that the table of contents does not follow the content itself so once you click a link you will lose sight of it.
Don’t worry, CSS has a property that it’s perfect for what we need, it’s called sticky and will help us make the table of contents stick at the top of the page.
What we need to do is simply add this CSS lines:
#table-of-content {
  width: 30vw;
  /* these two lines will do the trick */
  position: sticky;
  top: 0;
}
The support for this property is quite widespread, even without prefixes.
Now that we have our sticky table of contents, we want to add a quick check on page load to see if the URL already contains a section and in that case, navigate right to it.
Open again your JavaScript file and after the last line we typed, still inside of our if statement, add this:
// automatically go to the correct section on load
if (location.hash) {
  const target = location.hash
  const offsetY = document.querySelector(target).offsetTop
  window.scrollTo(0, offsetY)
}
In case somebody shared your article in section 1, location.hash will contain ‘#section_1’ so what we are doing here is intercepting it on load and scrolling the window right to the appropriate section.
This can be useful if you want to share a specific part of your article and want the page to load at the appropriate part of the content, not at the top.
Awesome, go ahead and try everything we did so far. It works fine right? But wouldn’t it be nicer if clicking a link scrolled smoothly to the appropriate section instead of jumping?
CSS these days is amazing and for this, we only need one line of code.
html {
  scroll-behavior: smooth;
}
This will do it!, unfortunately, it’s not as supported as ‘sticky’ and it won’t work on Safari (and Internet Explorer and Edge). You can use a polyfill such as https://www.npmjs.com/package/smoothscroll-polyfill to achieve the expected result.
Now you have a fully functional table of contents generated dynamically based on the headings of your article.
It’s time for you to do some homework! These are two possible improvements that this small project could benefit from:
h3 tags in the table of contents, how would we go about allowing for nested headings? h3 inside of h2 for example?